You can follow this tutorial if you’re about to replace the coolant heater core rubber hoses in a Volvo 850 (1991-1997), S70 V70 (1997 – 2000) or C70 (1997-2005).
If you’re after how to replace the heater core under the dashboard, check here: Volvo 850, S70, V70, C70 How to replace the heater core
If you’re after how to replace the engine radiator hoses, check here: Volvo 850, S70, V70, C70 – How to replace upper and lower radiator hoses
After more than 20 years of services I decided to replace all of the original coolant hoses in my Volvo 850. This tutorial focuses on the rubber heater core hoses. This hoses on my car haven’t failed yet, but when pressed they felt very weak.
Required new parts
– New lower / outlet (Volvo P/N 9186847) and upper / inlet (Volvo P/N 9186849) heater core hoses.
– New heater core coupling o-rings kit (Volvo P/N 3545662)
When looking for new coolant hoses I had to chose between new Volvo OEM hoses, less expensive aftermarket rubber hoses or try to find reliable silicone replacement ones.
Given that I already had problem with aftermarket rubber hoses in other cars that was not an option. So I’ve searched the Internet to see if silicone replacement ones were available for similar OEM Volvo hoses prices.
I end up finding www.do88.se website. This Swedish company offers the complete set of Volvo coolant silicone hoses and they are the official supplier of Koenigsegg supercars hoses so the quality is guaranteed!
So I end up getting their VOLVO 850/S70/V70 TURBO 94-00 HEATER HOSES Kit (reference do88-kit126S), wich includes both heater core hoses. These are available directly from their website here: https://www.do88.se/en/artiklar/volvo-850_s70_v70-turbo-94-00-coolant-hoses.html. Priced at ~48 EUR / USD these are a lot cheaper than OEM ones and roughly the same price as OEM replacement pipes of dubious quality.
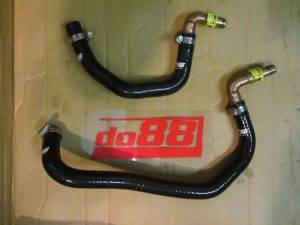
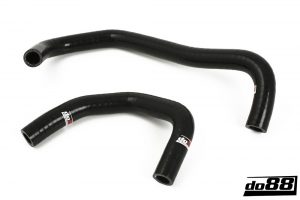 The International Shipping worked very well, with the hoses arriving quickly to my door, very well packaged and even included some do88 stickers. I ordered my kit in black to keep the look as OEM as possible, but you can also have them in red or blue.
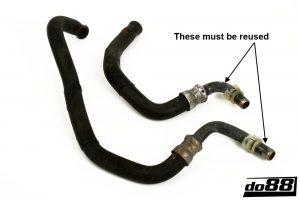
The only set back of this option is that you need to re-use the metal connectors to the firewall coupling. In this tutorial I’ll explain how to do it. If you are replacing your heater hoses with regular OEM ones, just ignore that step.
Heater core rubber hoses replacement tutorial
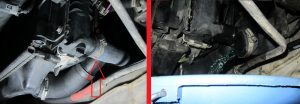
Step 1. Start by draining the coolant. I’ve done this by removing the lower radiator hose on the radiator. To gain access to it you’ll need to raise the front of the car and remove the splashguard under the radiator. You’ll easily see the lower radiator hose on the drivers side of the coolant radiator. Place a container under it, unscrew the clamp (original clamps screws ones are 7mm), remove the hose and let the coolant drain (The total coolant capacity is approximately 7.2 litres).
Step 2. To gain access to the heater core hoses you’ll need to remove the air filter box (Follow this instructions on how to remove air filter box in Volvo 850 / S70 / V70 / C70).
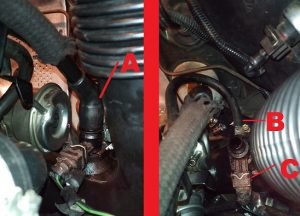
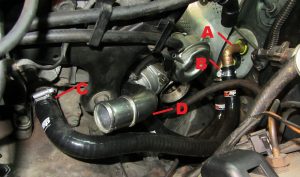
Once you have removed the air filter box, remove the air pipe that connects the air filter box to the turbo. In order to do it, disconnect the big hose that connects to the PTC valve (A in the pictures below), the small hose and the plug to the PTC valve (marked B and C in the pictures) and then the clamp that holds the pipe to the turbo. Remove the pipe from the car.
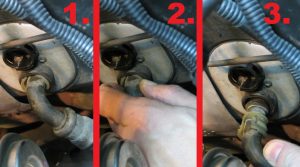
Step 3. You’ll now have good access to where the heater core hoses are connected to the firewall coupling. Carefully remove both hoses connectors on the coupling. To do this just tighten the white tabs and pull the connector as straight back as possible to avoid breaking the coupling.
When removing the connectors, check it the o-rings (2x on each connector) and washer come out with it. If not, be sure to remove them from the inside of the coupling before inserting the new hose.
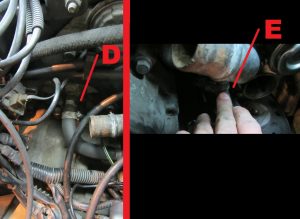
Step 4. Now it’s just a matter of removing the other ends of the heater core hoses. The top one goes to the side of the engine block (D on the picture), behind the main radiator hose (missing in the picture), and the bottom one goes to the iron pipe that is behind the engine block (E on the picture).
Step 5. (Ignore if you are using new hoses with the metal ends already in them)
As I opted for silicon hoses as new replacements I had to re-use the original metal pipe connectors to the firewall coupling. To remove them from the old hoses, I’ve carrefully cutted the metal joint/coupler between the metal connectors and the old rubber hoses. I’ve used a dremel to cut the couplers, but you can easily do it with a metal hacksaw.
Once the metal connectors are removed, insert them in the new hoses and attach them with new clamps. As you can see from the picture, the longer connector goes in the longer hose.
Step 6. Now, insert the yellow plastic connectors and the new o-rings and washerin each of the metal connector (sadly I didn’t have a picture of this step, order is o-ring -> washer -> o-ring), and carefully re-insert them in the firewall coupling. Note that the longer hose goes in the top (A on the picture), and the lower one goes in the bottom (B on the picture).
Attach the other end of the longer hose (the top one) to the side of the engine block (C on the picture), behind the main radiator hose (missing in the picture), and the bottom one goes to the iron pipe that is behind the engine block (D on the picture).
Step 7. Reconnect the air pipe that connects the air filter box to the turbo. Don’t forget to install the big hose that connects to the PTC valve (A in the pictures below), the small hose and the plug to the PTC valve (marked B and C in the pictures). Tighten the clamp that holds the pipe to the turbo.
Step 8. Install the air filter box, and plug the MAF connector.
Step 9. Re-install the lower radiator coolant hose and tighten the clamp.
Step 10. Refill the coolant system with the correct antifeeze mixture until the MAX mark in the coolant reservoir. I allways use the original Volvo antifreeze mixed in 50% with distilled water. Start the engine, let it reach operating temperature and top up the coolant if necessary. Check for leaks and if everything is ok, you’re good to go!
The instructions in this tutorial will work in the following models / years:
– 1991,1992, 1993, 1994, 1995, 1996 and 1997 Volvo 850 Petrol and Diesel Engines
– 1997, 1998, 1999 and 2000 Volvo S70 Petrol and Diesel Engines
– 1997, 1998, 1999 and 2000 Volvo V70 Petrol and Diesel Engines
– 1997, 1998, 1999, 2000, 2001, 2002, 2003, 2004 and 2005 Volvo C70 Coupe and Convertible / Cabrio Petrol Engines

